Showing posts with label Breakfast. Show all posts

Sev Paratha Recipe | How to make Sev Paratha | Easy Paratha Recipe [Video]


Sev Paratha recipe with step by step video instructions. Sev Paratha is a wholewheat based flatbread that is stuffed with sev, onions and spices. Sev Paratha makes for a delicious breakfast or a light evening snack. 

In a hurry? Jump to Video or Jump to Recipe


Sev Paratha recipe, how to make sev paratha, aloo bhujia paratha

Sev Paratha!! It's so yummy, you have got to try it!

Last year when the pandemic waned a little, I found myself alone for lunch one day with just a packet of thick sev in the snacks box. And I just got a lunch idea. I had seen sev paratha on TV but never really made any or eaten too. Why not? was the thought behind cooking that lonesome lunch.

The paratha was everything I had hoped for - loaded with the stuffing and spices tingling in my mouth.

What is Sev?


If you have never had sev, you should head over to the nearest supermarket or Indian store and pick up a packet. It tastes amazing sprinkled on top of literally anything. 

Sev is a deep fried Indian snack made from gram flour (besan) or chickpea flour. It looks like fine yellow vermicelli. Sev has many sizes, from the finest nylon sev to the thick sev. 

For the sev paratha, I recommend the slightly thicker sev so they hold their shape and don't dissolve away. You can use aloo bhujia too or any flavored sev like garlic or palak.

Sev Paratha recipe, how to make sev paratha, aloo bhujia paratha


More details...


The stuffing for sev paratha is very very easy to make. It is made of just 5 ingredients - sev , obviously, finely chopped onions (skip for a Jain version), coriander leaves, chaat masala and red chilli powder. I did not add any salt as the sev already is salty and the chaat masala has salt too. Just mix and you are ready to stuff. Make the stuffing just before you are ready to roll out the parathas to prevent it from getting soggy.

The dough is your regular roti/chapati dough made from atta (wholewheat flour), water and salt. 

Sev Paratha recipe, how to make sev paratha, aloo bhujia paratha


If you made this recipe, let me know! Leave a comment here or on Facebook tag your tweet with @oneteaspoonlife on Twitter, and don't forget to tag your photo @oneteaspoonoflife on Instagram. You can also email me at onetspoflife@gmail.com I'd love to see what you are up to.

If you like this recipe, do not forget to share it with your friends and family! 


You can follow One Teaspoon Of Life on FacebookTwitterInstagramPinterest or you can subscribe to One Teaspoon Of Life and receive all the latest updates via Email


Video Recipe


--------------------------------------------------------------------------------------------------------------------------


Sev Paratha Recipe | How to make Sev Paratha


Sev Paratha recipe, how to make sev paratha, aloo bhujia parathaSev Paratha is a stuffed wholewheat faltbread. The paratha is stuffed with a a mixture of fried gram flour vermicelli called sev, onions and spices. The vegan flatbread is pan fried. It makes for a delicious breakfast.

Recipe Type:  Breakfast
Cuisine:            Indian
Prep Time:     45 minutes
Cook time:     15 minutes
Total time:     60 minutes
Yield:                3 Parathas

Ingredients:


1 cup Thick Sev
1 Onion, finely chopped
2 Tbsp Coriander leaves, finely chopped
1 tsp Chaat Masala
1 tsp Red Chilli Powder
1.5 cup Wholewheat Flour
0.5 tsp Salt
1 cup Water
Oil for roasting the parathas
Dry flour for dusting

Method:


1. Knead a soft dough with the whole wheat flour, salt and water. Add water as required. Cover and rest for 20 minutes.
2. In a smaller bowl, mix together the sev, onion, coriander leaves, chaat masala and red chilli powder. Add salt if required, I did not as the sev and chaat masala, both contain salt.
3. Divide the dough into 3 equal portions and roll them out into small disks. Use dry flour for dusting as required to prevent the dough from sticking to the surface.
4. Spoon the stuffing equally onto each of the dough disks and seal the edges of the dough.
5. Dust the counter with dry flour and roll out the parathas to around 6 inches in diameter or as thin as you can.
6. Heat a frying pan or a tava and grease it. Place the paratha on the tava and spoon oil over it and around it. Once the first side is slightly brown, flip the paratha and continue to cook. Cook until both sides are browned and the paratha is cooked. Serve hot.


If you liked this, you may also like:

onion chickpea flour stuffed whole-wheat flatbread
Pyaz Besan Paratha

beet root paratha
Beetroot paratha
szechuan paratha
Schezwan Paratha


Read more ...

Dal Chat Recipe | How to make Dal Chaat | Moradabadi Dal Chat Recipe [Video]


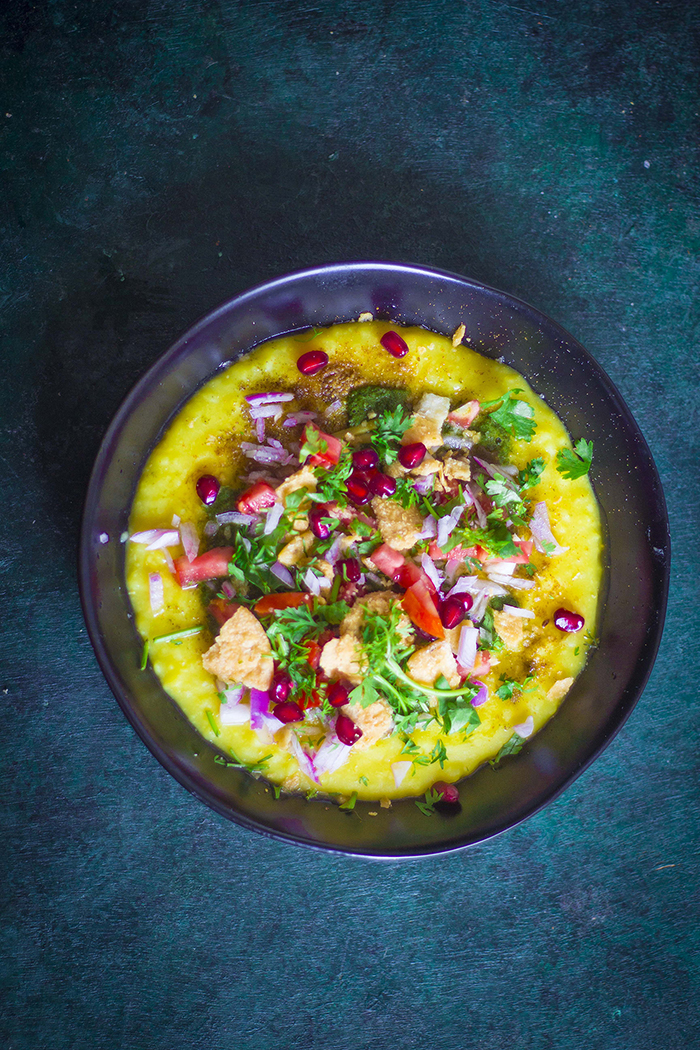
Dal Chaat or Moong Dal Chat is a tasty and nutritious breakfast or snack that is made by topping cooked moong dal (lentils) with fresh vegetables and chutneys. Dal Chaat can be made to suit a vegan and Jain diet.

In a hurry? Jump to Video or Jump to Recipe

Moradabadi Dal Chat, moong dal chaat

Dal chaat is a homely, hearty, healthy, and delicious dish that is super easy to make. It can be as simple as you like or as fancy as you like. It is made from cooked moong dal and is topped with a variety of fresh vegetables, fruits, and chutneys. It is a mix of textures and flavors. Best of all, it is probably one of the healthiest chats out there. It is also very easy to veganize this recipe.  

What is Dal Chaat?

Chaat is simply a finger licking snack and Dal is cooked lentils, in this case, moong dal or mung bean lentils.

Dal chaat has its origin in Moradabad, a town in Western Uttar Pradesh. It is popularly available sold there on the streets all day long. People have it as a breakfast or a filling meal throughout the day.

Moradabadi Dal Chat, moong dal chaat


How is Dal Chaat made?


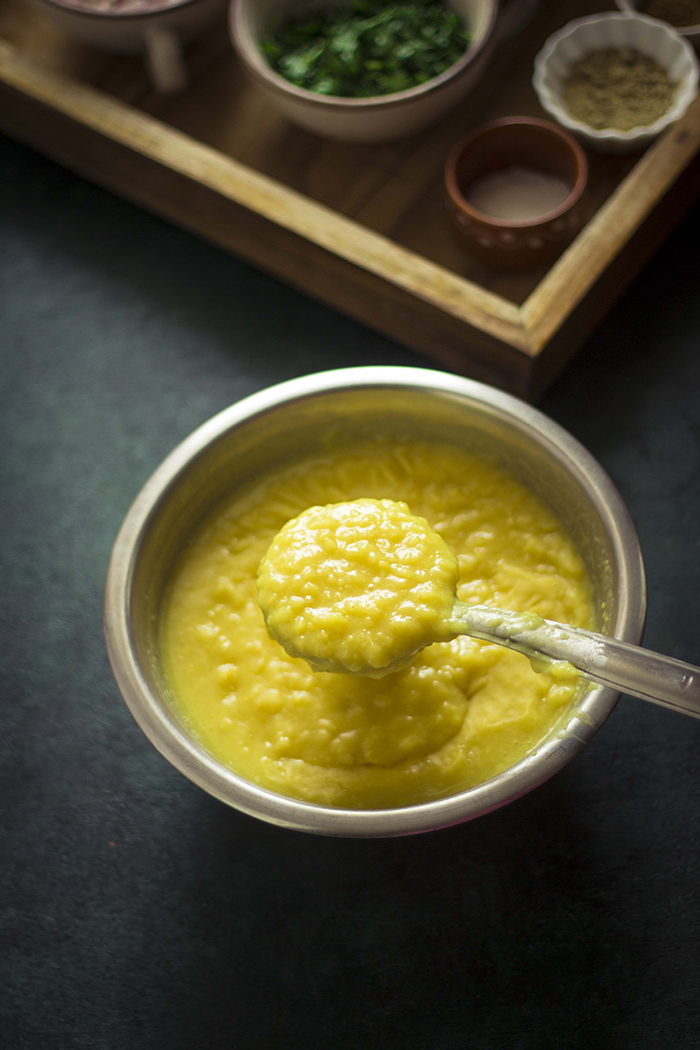
To make dal chaat, you first need to cook the dal. Wash and soak the yellow moong dal for 20-30 minutes. Don't use the "chilka wala moong dal" or the moong dal with skin for this recipe as it will not be as creamy as it is supposed to be. Cook the moong dal until it is completely cooked and mushy. You can either pressure cook it or cook it on a pot on the stovetop. 

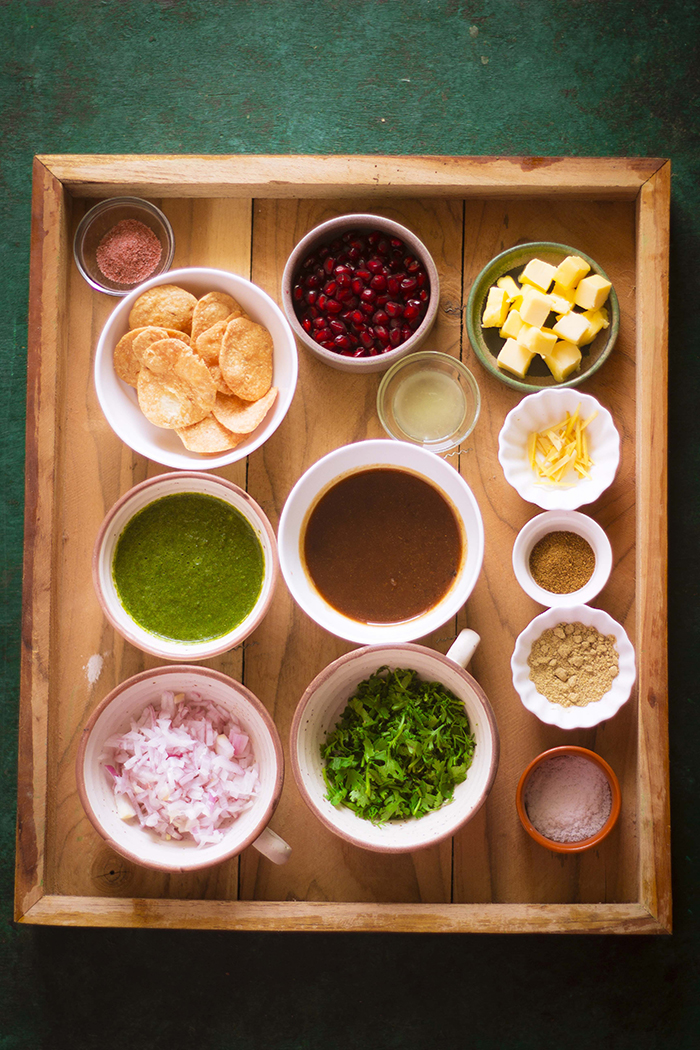
While the dal cooks, prep all the other ingredients - chop the onions, tomatoes, coriander leaves and ginger. Deseed the pomegranate. And lastly, cube the butter. 

You can buy the green chutney, tamarind chutney and papdi or you can make your own. I will leave the links for the chutneys in the recipe below.


Moradabadi Dal Chat, moong dal chaat

Moradabadi Dal Chat, moong dal chaat


Vegan and Jain option


To veganize the dal chaat, skip the butter or use vegan butter or just a few spoonfuls of your favorite extra virgin oil.

To make a Jain friendly dal chaat, skip the onions and ginger. You can instead top it with finely chopped cucumber for additional texture. Also, make sure that the green and tamarind chutney are free of ginger and garlic.


Moradabadi Dal Chat, moong dal chaat


If you made this recipe, let me know! Leave a comment here or on Facebook tag your tweet with @oneteaspoonlife on Twitter and don't forget to tag your photo @oneteaspoonoflife on Instagram. You can also email me at onetspoflife@gmail.com I'd love to see what you are up to.

If you like this recipe, do not forget to share it with your friends and family! 


You can follow One Teaspoon Of Life on FacebookTwitterInstagramPinterest or you can subscribe to One Teaspoon Of Life and receive all the latest updated via Email


Video Recipe


--------------------------------------------------------------------------------------------------------------------------

Dal Chaat Recipe | Moradabadi Dal Chat | How to make Moong Dal Chat


Moradabadi Dal Chat, moong dal chaat Dal Chaat or Moong Dal Chat is a tasty and nutritious breakfast or snack that is made by topping cooked moong dal (lentils) with fresh vegetables and chutneys. Dal Chaat can be made to suit a vegan and Jain diet.

Recipe Type:  Breakfast, Snacks
Cuisine:            North Indian
Prep Time:     30 minutes
Cook time:     30 minutes
Total time:     60 minutes
Yield:                Serves 2-3

Ingredients:


1 cup uncooked Moong Dal
50gms of Butter, cubed or 4-6 tsp Oil
1 Onion, finely chopped
1 Tomato, finely chopped
3-4 Tbsp Pomegranate seeds
2-3 Tbsp Coriander leaves, chopped
1" Ginger, chopped into matchsticks
8-10 Papdi or any Crackers
0.5 cup Coriander Mint Chutney (green chutney)
0.5 cup sweet and sour Tamarind chutney
Black salt as per taste
Salt to taste
Cumin powder to taste
Chat masala to taste
Lime juice or lemon juice

Method:


1. Wash the moong dal twice and soak the dal and keep aside for 20-30 mins.
2. After 30 minutes, pressure cook the dal with 2 cups of water or in a pot on the stovetop until the dal is completely cooked and soft.
3. Prep all the other ingredients while the dal cooks.
4. Once the dal is cooked, lightly mash the dal with the back of a spoon.
5. To assemble the dal chat, add a few cubes of butter to the plate and spoon over warm dal. If making a vegan version, you can replace the butter with vegan butter or replace with your favorite extra virgin oil.
6. Sprinkle black salt, cumin powder, chat masala and regular salt (optional).
7. Add some more butter or oil.
8. Spoon over the green chutney and the tamarind chutney.
9. Top with chopped onion, tomato, coriander leaves and pomegranate seeds.
10. Lightly crush a few papdi or crispy crackers and add to the chat.
11. Squeeze some lime juice and serve warm-hot.


If you liked this, you may also like:

Gluten free fluffy pancake made from moong dal  with pizza toppings
Moonglet

bangalore street food masala puri chat
Masala Puri
crispy moong dal namkeen
Crispy Moong Dal


Read more ...

Moonglet Recipe | Moong Dal Pizza Recipe [Video]


Moonglet recipe with step by step photos and video instructions. Moonglet is a popular North Indian street food. Moonglet is a fluffy pancake made from split mung beans and topped like a pizza with vegetables, seasoning and cheese. Moonglet is gluten free. This recipe can be adapted to suit a vegan diet and a Jain diet.

In a hurry? Jump to Video or Jump to Recipe


Gluten free fluffy pancake made from moong dal  with pizza toppings

You guys, you have got to try this fluffy pancake meets Pizza aka Moonglet. It is light, flavorful and so customizable. It is also gluten-free and can be adapted to suit a plant-based / vegan diet and the Jain diet. So easy too.

I saw this on YouTube and I knew instantly that I had to try it. The idea of a gluten-free pizza made with all natural ingredients was too tempting to resist.

Gluten free fluffy pancake made from moong dal  with pizza toppings


I loved the crispy outside. I love the soft and fluffy inside. And I love the toppings. I've topped the Moonglets with so many different toppings - capsicum, tomato, baby corn, onion, paneer, tofu, etc. It is really your choice. I also found topping the Moonglet with pizza seasoning made it even more yum. You can either go the Italian way like I did and top with oregano, garlic powder, etc. or try a fajita seasoning. It's all in your hands.

Making the batter needs a little bit of patience, this is not an instant recipe. The moong dal or deskinned split mung beans need soaking. If you are short of time, soak for just 2 hours and if you have the time, you can soak it overnight. I just would not exceed 10 hours. Then just grind the moong dal along with ginger and green chilies to make a smooth batter. The dal itself will be moist and you may not require any extra water. Grind it as thick as possible, we can add water later while making the Moonglet. The Moonglet gets its fluffiness from Eno fruit salt, if you don't have Eno, use baking soda and a teaspoon of lime juice to help it get the rise. It may not be as fluffy as with Eno, but it will still be light. I have found adding a little water along with the Eno, helps it fluff up better.

Gluten free fluffy pancake made from moong dal  with pizza toppings


Now how many Moonglets you make is all up to the size of your pan. I prefer making several small ones instead of one large one. It makes it much easier to flip them. I suggest using the smallest frying pan you have to make them and dividing the batter accordingly. Grease the pan and add the batter. Top with whatever you choose and use the back of the spatula to press the toppings in.  Once the first side cooks, flip and cook the other side and top with cheese before serving.

This was my easy version of the Moonglet. YouTube is awash with several versions, some even go the cheese burst way where the Moonglet is cut open carefully and cheese is put inside along with the topping and allowed to melt. I would love to try that out someday.

Always, always serve the Moonglet hot. You can serve it with sauce or chutney or even salsa, something to just dip the Moonglet it.


Suggestions to suit other diets:


  • To adapt the recipe to a vegan / plant-based diet, use only vegetables or use tofu for the topping. You can either skip the cheese or use vegan cheese.
  • To adapt the recipe to a Jain diet, skip the ginger in the batter. You can replace it with asafoetida or hing.


Gluten free fluffy pancake made from moong dal  with pizza toppings


If you made this recipe, let me know! Leave a comment here or on Facebook tag your tweet with @oneteaspoonlife on Twitter and don't forget to tag your photo @oneteaspoonoflife on Instagram. You can also email me at onetspoflife@gmail.com I'd love to see what you are up to.

If you like this recipe, do not forget to share it with your friends and family! 


You can follow One Teaspoon Of Life on FacebookTwitterInstagramPinterest or you can subscribe to One Teaspoon Of Life and receive all the latest updated via Email


Video Recipe


--------------------------------------------------------------------------------------------------------------------------

Moonglet Recipe | Moong Dal Pizza Recipe


Gluten free fluffy pancake made from moong dal  with pizza toppingsMoonglet is a popular North Indian street food. Moonglet is a fluffy pancake made from split mung beans and topped like a pizza with vegetables, seasoning and cheese. Moonglet is gluten free. This recipe can be adapted to suit a vegan diet and a Jain diet.

Recipe Type:  Breakfast / Snacks
Cuisine:            North Indian
Prep Time:     5 hours
Cook time:     30 minutes
Total time:     5 Hours 30 Minutes (includes soaking time)
Yield:                3 to 4


Ingredients:


1 cup Moong Dal
2 Green Chillies
1 tsp Ginger, grated
1 tsp Eno fruit salt
1 tsp Pizza seasoning
Sliced vegetables for topping
Sliced paneer for topping
2 tbsp Coriander leaves, chopped
3-4 Tbsp Cheese, grated
3-4 Tbsp Oil
Salt to taste
Water as required

Method:


1. Wash the moong dal and soak it for 5 hours.
2. Drain the moong dal and grind it along with ginger and green chillies and 1 Tbsp of water until smooth. The batter has to be thick, so don't add too much water.
3. Add salt as per taste and the eno to the batter.
4. Add water if required and mix well until the eno is combined and the batter is fluffy.
5. Heat oil in a small non stick pan and add spoonfuls of the batter. Divide the batter depending on the size of your pan. I made 2 moonglets with a 6" frying pan.
6. Keep the pan on low heat and arrange the toppings. I used sliced capsicum, tomato and paneer.
7. Top with chopped coriander leaves and pizza seasoning.
8. Gently press the toppings into the moonglet with the back of a spatula.
9. Cover and cook on low heat for 6-8 minutes or until one side is cooked.
10. Gently flip the moonglet and spoon oil on the sides.
11. Remove from heat once the second side is cooked too.
12. Top with grated cheese.
13. Cut into slices and serve.


Gluten free fluffy pancake made from moong dal  with pizza toppings


Gluten free fluffy pancake made from moong dal  with pizza toppings

Gluten free fluffy pancake made from moong dal  with pizza toppings


If you liked this, you may also like:

eggless omelette made with chickpea flour
vegan Omelet

How to make vegan frittata recipe at One Teaspoon Of Life How to make vegetarian vegan omelet recipe at www.oneteaspoonoflife.com
Vegan Zucchini Spinach Frittata
How to make vegan beetroot besan dosa beetroot paratha recipe at www.oneteaspoonoflife.com
Beetroot Chickpea Pancake


Read more ...

Schezwan Paratha Recipe | Szechuan Paratha Recipe [Video]


Schezwan Paratha is a Chinese inspired stuffed Indian wholewheat flatbread. The paratha is stuffed with a spicy cabbage, capsicum and onion stuffing.

In a hurry? Jump to Video or Jump to Recipe


szechuan paratha


When normal people think Paratha, schezwan paratha doesn't even pop up in the head. But for a foodie, anything is possible and this schezwan paratha possibly popped in some Indo-Chinese food-obsessed North Indian foodie. Just to let you know, this is not my idea. Na-ah. But the recipe is definitely my own.

Six years ago, I watched a Gujarati cooking show that showed the making of a schezwan paratha. I didn't understand the language, but as they say, food has a language of its own. And that's what happened, I got the gist of the dish while I didn't understand a word of the instructions. And after a few attempts, this paratha was here to stay.

Schezwan Paratha is a perfect fusion of two styles of cuisine. The Chinese inspired vegetable mix is stuffed inside a whole wheat dough, rolled and pan-fried until crisp. The paratha satisfies several cravings - craving for Chinese food, craving for comforting Parathas, the craving for spice and of course, the basic craving for some delicious and new food.

szechuan paratha


Any stuffed paratha has 2 parts, the stuffing, and the coating. The coating, in this case, is a regular dough made of wholewheat flour, a pinch of salt and water. The dough is kneaded the same way one would for chapati or other parathas. If you want you can add some maida or all purpose dough as well while kneading the dough. The soft dough is stuffed with a spicy mixed vegetable stuffing. The stuffing, in this case, is made with julienned vegetables such as onions, capsicum, and cabbage. You can also add carrots. The vegetables are cooked down with a spicy homemade garlic-chilli sauce that is ready in 15 minutes.

Paratha is generally as breakfast item as it is filling and it gives you energy to cruise through the day. But parathas are also a great dinner option. Pair paratha up with some homemade yogurt (Dahi) and pickle and you are all set to lull yourself to a food coma.


szechuan paratha

If you made this recipe, let me know! Leave a comment here or on Facebook tag your tweet with @oneteaspoonlife on Twitter and don't forget to tag your photo @oneteaspoonoflife on Instagram. You can also email me at onetspoflife@gmail.com I'd love to see what you are up to.


If you like this recipe, do not forget to share it with your friends and family! 


You can follow One Teaspoon Of Life on FacebookTwitterInstagramPinterest or you can subscribe to One Teaspoon Of Life and receive all the latest updated via Email


Video Recipe


--------------------------------------------------------------------------------------------------------------------------

Schezwan Paratha Recipe | Szechuan Paratha Recipe


szechuan parathaSchezwan Paratha is a Chinese inspired stuffed Indian wholewheat flatbread. The paratha is stuffed with a spicy cabbage, capsicum and onion stuffing.

Recipe Type:  Main
Cuisine:            Indian
Prep Time:     30 minutes
Cook time:     30 minutes
Total time:     60 minutes
Yield:                Makes 4 Parathas


Ingredients:


For the stuffing:


3 cups shredded Cabbage
0.5 Capsicum, julienned
1 Onion, julienned
8-10 dry Red Chillies
1 Tbsp chopped Garlic
1 Tbsp Vinegar
2 Tbsp Oil
Salt to taste
Water as required

For the dough:


2 cups Wholewheat flour
0.25 tsp Salt
Water as required
Oil to fry the parathas

Method:


1. Soak the dry red chillies in hot water and keep aside.
2. Add the salt to the wholewheat flour and knead into a smooth dough using water as required. Cover and allow it to rest until the stuffing is ready.
3. Drain the red chillies. Deseed the red chillies if you don't want a very spicy stuffing.
4. Blend together the red chillies, chopped garlic, 0.5 tsp salt, and vinegar into a smooth schezwan sauce. Add little water if required to help the blending process.
5. Heat 2 Tbsp oil in a kadhai and add in the sliced onions. Cook until the onions are golden.
6. Add in the julienned capsicum and fry for 1 minute.
7. Add 1-2 Tbsp of the schezwan sauce or as required. Fry for 1 minute.
8. Add in the shredded cabbage and salt for taste. Add more schezwan sauce if required. Cook until the cabbage is soft.
9. Remove from heat and allow it to cool.
10. Divide the dough into 4 equal parts and roll into balls.
11. Dust the counter with a part of the remaining flour and roll out the dough into small circles.
12. Divide the stuffing into 4 equal parts and spoon onto the dough. Seal the parathas.
13. Dust flour on the counter as required and roll out the parathas as thin as possible.
14. Heat the tava or a flat pan and grease it. Place the rolled paratha on the tava and spoon oil and spread well.
15. Flip the paratha and cook until the it is cooked on one side.
16. Flip the paratha again and cook until the second side is cooked. Press with a spatula so that the paratha is cooked evenly.
17. Serve the parathas hot along with either butter,  or curd (yogurt).


If you liked this, you may also like:

How to make shakharkand aloo cheese paratha recipe at www.oneteaspoonoflife.com
Sweet Potato Cheese Paratha

How to make vegan methi fenugreek paratha recipe at www.oneteaspoonoflife.com
Methi Paratha
beet root paratha
Beetroot Paratha


Read more ...

Vegan Omelette Recipe | How to make omelet without eggs [Video]

Vegan Omelette or Vegetarian Omelet without eggs! This omelet is made using chickpea flour and plain all purpose flour.  Enjoy it guilt free!

In a hurry? Jump to Video or Jump to Recipe

eggless omelette made with chickpea flour

This Vegan Omelette HAS to be on your breakfast menu!!

Eggs have always been so tightly associated with breakfast, that if you don't eat any (like me), you are left with very few options. Well, until now!! Presenting the Omelet without eggs, that tastes just like it was made with eggs. You can hardly tell the difference.

This Omelet has become a go-to breakfast for us on those busy weekday mornings or on those really lazy Sunday mornings. Sometimes, dinner too.

I have to thank Gee for introducing me to this recipe. She saw this online and made it for me. We LOVED it!! We were surprised that this tasted so much like the real deal. I've tried the cheese omelet and trust me, that is so so close to the Cheese Omelet made with eggs that you could fool anyone.

eggless omelette made with chickpea flour


Wondering what makes this taste like the real egg omelette? Black Salt. Just one simple ingredient.

The funky smell of black salt has always been equated to that of eggs. The smell comes because of the high sulphur content in the salt. Much like those hot water springs, but much milder. Black salt is now easily available online and pretty much all over the world. If you do buy black salt, you can use it in so many more recipes or sprinkle it over fruits or that salad for a different taste.

Why you SHOULD make this Omelette:

  • If you turned vegan and miss eating eggs, then you should make this and be guilt free. You can eat the cake and have it too!
  • It is so easy to make, you should definitely add it to your breakfast recipes list. After all, we are always looking for one more of those to add to the kitty.
  • If you've never eaten eggs in your life, at least, now you will know what they taste like and what the hypes all about.
  • Got any more good reasons? Leave a comment.

eggless omelette made with chickpea flour

eggless omelette made with chickpea flour


If you made this recipe, let me know! Leave a comment here or on Facebook tag your tweet with @oneteaspoonlife on Twitter and don't forget to tag your photo @oneteaspoonoflife on Instagram. You can also email me at onetspoflife@gmail.com I'd love to see what you are up to.


If you like this recipe, do not forget to share it with your friends and family! 


You can follow One Teaspoon Of Life on FacebookTwitterInstagramPinterest or you can subscribe to One Teaspoon Of Life and receive all the latest updated via Email


Video Recipe


--------------------------------------------------------------------------------------------------------------------------

Vegan Omelette Recipe | Eggless Omelet Recipe


eggless omelette made with chickpea flourVegan omelette or vegetarian omelet is an omelet made with chickpea flour and plain flour instead of eggs. A quick breakfast recipe.

Recipe Type:  Breakfast
Cuisine:            International
Prep Time:     10 minutes
Cook time:     10 minutes
Total time:     20 minutes
Yield:                Makes 4 omelettes

Ingredients:


0.3 cups Chickpea Flour
0.3 cups Flour
0.25 tsp Turmeric Powder
1 Onion, finely chopped
1 Green Chilli, finely chopped
2 Tbsp Coriander leaves, finely chopped
Black salt to taste
Pinch of baking soda
Water as required
Oil to pan fry the omelettes

Method:


1. Take the chickpea flour and plain flour in a bowl. Add 0.5 cup of water and whisk until smooth.
2. Add in the turmeric powder, chopped onion, chopped green chilli, chopped coriander and mix well.
3. Add in more water if required.
4. Add in the black salt to taste and mix well.
5. Add in the baking soda and mix well.
6. Heat a pan and grease it. Spoon in the batter and cook on medium heat until one side cooks.
7. Spoon some oil over the top and flip the omelette. Cook until the other side is cooked.
8. Remove from heat and serve with toast.


If you liked this, you may also like:

How to make vegan frittata recipe at One Teaspoon Of Life How to make vegetarian vegan omelet recipe at www.oneteaspoonoflife.com
Vegan Zucchini Spinach Frittata

spiced scrambled tofu with wilted spinach
Spinach Tofu Scramble
Vegan Tomato Onion Avocado Olive Mint Coriander Italian Sourdough Baguette Bread Sandwich
Breakfast Bruschetta


Read more ...

Dahi Vada Recipe | How to make Dahi Vada [Video]


It's still Summer, the perfect time to have these chilled Dahi Vadas. Dahi Vada is a popular Indian snack that consists of soaking a savory lentil donut in yogurt and topping with a combination of sweet and spicy chutneys and some spice powders. 

In a hurry? Jump to Video or Jump to Recipe


curd vada

Cool and refreshing! Just 2 words to describe this Dahi Vada.

Dahi Vada has been a favorite of mine since childhood, the soft vadas dunked in a sweet dahi (yogurt), what's not to love. And in a place like Goa which is always hot, the chilled vadas are always welcome.

Apart from eating cool stuff, how do you keep your cool?


curd vada


A few months ago, I had posted the recipe for Medu Vada or Uddina Vada, that forms the base of this Dahi Vada. I never claim to be an expert or a chef, I am just a home cook who loves cooking and taking photos of food. But when I posted the recipe of Medu Vada on one of the Facebook Groups, a nasty man commented that it is okay for me to make misshapen vadas for home, but if I had to post it on Facebook, I should make them perfectly round. I was so upset when I read the comment, but Raj calmed me down and asked me to ignore it. And then I realized the power of women. By the time I woke up the next morning, a bunch of women had replied aptly to the man as well as asked me to continue posting. I haven't thanked each of those women personally, but I would like to take this opportunity to thank all of them once again. The way all the women got together and defended me, made me feel so special and loved. 

It reaffirmed my belief that Food Connects People!

Also, it got me thinking, why we assign so much importance to perfection and detail. Why do vadas or laddoos have to be perfectly round? Why do we want perfectly concentric circles in our Chaklis?Why to vegetables have to be blemish free and shaped perfectly? While I got thinking about all this, it reminded me of watching Jamie Oliver talk about "wonky vegetables" and how that desire for perfection led to so much food waste around the world. As a food blogger, it is my job to make my food look as good as possible, but I would never resort to using food coloring or wax or any of the other tactics advertising companies use to sell food. So while my food may be imperfect in shape and appearance, I can assure, it is food that I eat as well as I serve to my family. 

Deep thoughts, I know for a very light and refreshing recipe post, but I had to say it.

So don't worry if your food or your clothes or your hair doesn't look perfect. Own it! Ignore the bad and absorb the good.

Wishing you a Sunny day ahead!

curd vada

If you made this recipe, let me know! Leave a comment here or on Facebook tag your tweet with @oneteaspoonlife on Twitter and don't forget to tag your photo @oneteaspoonoflife on Instagram. You can also email me at onetspoflife@gmail.com I'd love to see what you are up to.


If you like this recipe, do not forget to share it with your friends and family! 


You can follow One Teaspoon Of Life on FacebookTwitterInstagramPinterest or you can subscribe to One Teaspoon Of Life and receive all the latest updated via Email


Video Recipe


--------------------------------------------------------------------------------------------------------------------------

Dahi Vada Recipe


curd vadaDahi Vada is a popular snack in which a savory lentil donut is soaked in sweet and salty yogurt and then topped with sweet tamarind chutney, spicy green chutney and spice powders. Served chilled, this make a perfect summer snack.

Recipe Type:  Snacks, Breakfast
Cuisine:            Indian
Prep Time:     4 Hours
Cook time:     60 minutes
Total time:     5 Hours
Yield:                Makes 12 small dahi vadas

Ingredients:


1 cup Urad Dal
1 Tbsp Rice Flour
6-8 Curry leaves, finely chopped
1 Green Chilli, finely chopped
0.5 tsp Pepper, freshly crushed
A pinch of baking soda
500gms Yogurt
4-5 Tbsp Tamarind Chutney
4-5 Tbsp Green Chutney
1-2 Tsp Cumin Powder
1-2 tsp Red Chilli Powder
Salt to taste
Oil to fry
Water as required
Coriander leaves to garnish

Method:


1. Wash the urad dal and soak the dal in water for around 3-4 hours.
2. Drain the dal and grind into a fine batter. Use as less water as possible. The batter should be thick.
3. Heat oil in a kadhai to deep fry the vadas.
4. While the oil heats, add in the rice flour, green chilli, pepper, baking soda and salt. Mix well until combined. IF the dough feels watery, add a little more rice flour.
5. Once the oil is hot enough, wet your hands and take a spoonful of batter onto your fingers. Using the wet finger of the other hand, make a hole in the center. Watch the video for help on how to do this.
6. Gently drop the vada in the oil.
7. Fry on high heat for 1 minute, then lower the heat slightly and continue to cook until the vada becomes golden brown.
8. Now gently slide this batter into the oil. Stir the vada occassionally and flip it, so that it cooks evenly. Cook until golden brown on both sides.
9. Remove the vada from the oil and immediately drop in a bowl filled with water.
10. Gently immerse the vada in the water and let it soak for 30 minutes.
11. Meanwhile, whisk the yogurt (dahi) until smooth. Add in salt to taste. You can also add in a little sugar and a tempering of mustard seeds to the yogurt.
12. To serve, take 1-2 vadas and gently squeeze out the water and place in a serving bowl. Spoon over some of the yogurt (dahi) along with a little of the yogurt, top with a spoonful of tamarind chutney, green chutney and sprinkle cumin powder and red chilli powder. Garnish with chopped coriander leaves and serve.
13. If planning to serve later, then squeeze out all the vadas and place in a large bowl, pour the yogurt on it and chill in the fridge. Top with the chutneys and spice powders before serving.


If you liked this, you may also like:

Indian accompaniment made with yogurt, boondi (fried gram flour balls) and spices
Boondi Raita

dahi sandwich yogurt sandwich hung curd sandwich
Dahi Sandwich
medu vada medhu vada with chutney
Medu Vada


Read more ...